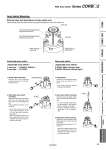
Cross recessed round head screw (1) (Right-hand and left-hand) Cover (B) Cover (A) Switch block (A) (Right-hand) Cross recessed round head screw (2) (Right-hand and left-hand) Switch block (B) (Left-hand) Holding block (A) D-T99 D-93A Auto Switch Mounting External view and descriptions of auto switch unit This following shows the external view and typical descriptions of the auto switch unit. Solid state auto switch Reed auto switch 3-wire type……D-S99(V)/S9P(V) 2-wire type……D-T99(V) D-97/93A (With indicator light) D-90/90A (Without indicator light) 1. Switch block detaching Remove the cross recessed round head screw (1) to detach the switch block. 1. Preparations Loosen the cross recessed round head screw (2) (About 2 to 3 turns). * This screw has been secured temporarily at shipment. 2. Solid state auto switch mounting Secure the solid state auto switch with the cross recessed round head screw (1) and holding block (A). Proper tightening torque: 0.4 to 0.6 (N・m) * Since the holding block (A) moves inside the groove, move it to the mounting position beforehand. ・ After the actuated position has been adjusted with the cross recessed round head screw (1), use the auto switch. 2. Reed auto switch mounting Insert the reed auto switch until it is in contact with the switch block hole. * For the D-97/93A model, insert the auto switch in the direction shown in the Fig. on the right. * Since the D-90/90A model is a round type, it has no directionality. 3. Reed auto switch securing Tighten the cross recessed round head screw (2) to secure the reed auto switch. Proper tightening torque: 0.4 to 0.6 (N・m) ・ After the actuated position has been adjusted with the cross recessed round head screw (1), use the auto switch. 53 With Auto Switch Series CDRB2 Angle Adjustment CRBU2WU CRBU2 CRB2WU CRB2 With Auto Switch Setting Component Unit Made to Order Simple Specials