es20-230b-crb2 57 / 60
10秒後にBOOKのページに移動します
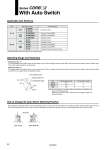
Applicable Auto Switches Size Auto switch model Electrical entry 10, 15 Reed D-90/90A Grommet, 2-wire D-97/93A Solid state D-S99/S99V* Grommet, 3-wire (NPN) D-S9P/S9PV* Grommet, 3-wire (PNP) D-T99/T99V Grommet, 2-wire 30, 40 Reed D-R73 Grommet, 2-wire D-R80 Connector, 2-wire Solid state D-S79* Grommet, 3-wire (NPN) D-S7P* Grommet, 3-wire (PNP) D-T79 Grommet, 2-wire; Connector, 2-wire * Solid state switch with 3-wire type has no connector type. Size q m: Operating range q d: Hysteresis range 10, 15 110° 10° 20, 30 90° 40 52° 8° Note) Since the figures in the above table are provided as a guideline only, they cannot be guaranteed. Adjust the auto switch after confirming the operating conditions in the actual setting. Auto switch Magnet OFF (OFF) θ d: Hysteresis range Actuated position: ON θ m: Operating range Operating Range and Hysteresis * Operating range: q m The range between the position where the auto switch turns ON as the magnet inside the auto switch unit moves and the position where the switch turns OFF as the magnet travels the same direction. * Hysteresis range: q d The range between the position where the auto switch turns ON as the magnet inside the auto switch unit moves and the position where the auto switch turns OFF as the magnet travels the opposite direction. How to Change the Auto Switch Detecting Position * When setting the detecting position, loosen the tightening screw a bit and move the auto switch to the preferred position and then tighten again and fix it. At this time, if tightened too much, screw can become damaged and unable to fix position. Be sure to set the tightening torque around 0.49 N・m. Set screw Size: 10, 15 Size: 20 to 40 52 Series CDRB2 With Auto Switch