8-p1315-1333-chn_enĀ@Ā@Ā@18 / 20
10ēbĆ„ā…BOOKāŐÉyĀ[ÉWā…ąŕďģāĶā‹ā∑
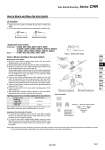
How to Mount and Move the Auto Switch Mounting correctly Mounting incorrectly 1. Tighten the screw under the specified torque when mounting auto switch. 2. Set the auto switch mounting band perpendicularly to cylinder tube. Caution Auto Switch Mounting Series CHN Mounting the Auto Switch 1. Mount the auto switch mounting band around the auto switch setting position on the cylinder tube. 2. Place the switch holder in the opening of the auto switch mounting band (1). 3. Make the concave part of the switch bracket faced downward and set the switch bracket on the switch holder (2). Set the switch bracket so that both ends of the auto switch mounting band enter the portion between the ribs on both side surfaces of the switch bracket. For the D-M9ū≠A (V) type auto switch, do not install the switch bracket on the indicator light. 4. Pass the auto switch mounting screw (M3) supplied with the auto switch mounting band from the through-hole side of the auto switch mounting band and engage it with the M3 female thread of the auto switch mounting band through the through-hole in the switch bracket. 5. Tighten the auto switch mounting screw with the specified tightening torque (0.6 to 0.7 NĀEm). 6. Insert the auto switch into the auto switch mounting groove of the switch holder (2). 7. After checking the detection position, tighten the set screw (M2.5) supplied with the auto switch to secure the auto switch. Adjustment the Auto Switch Position 1. To make the fine adjustment, loosen the set screw (M2.5) supplied with the auto switch and slide the auto switch inside the auto switch mouthing groove to adjust the position. 2. To move the auto switch setting position largely, loosen the screw (M3) that secures the auto switch mounting band and slide the auto switch together with the switch holder on the cylinder tube to adjust the position. Note) When removing the screw connection part with the auto switch mounting screw after the auto switch mounting band has been assembled, be careful not to drop the switch bracket, switch holder, auto switch mounting screw, or auto switch mounting band. When tightening the set screw supplied with the auto switch, use a watchmaker's screw driver with a handle diameter of 5 to 6 mm. Figure 1. Switch insert angle Aporox. 10 to 15Āč How to Mount and Move the Auto Switch