6-p0205-0212-kdm_en 3 / 9
10秒後にBOOKのページに移動します
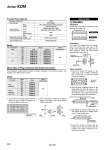
Clamp bolt Allen wrench (Nominal width across flats 4) Irregular faces for engagement Clamp bolt Screw for bracket Panel Panel mounting bracket Phillips screwdriver Mounting After loosening the screw, shift the bracket to the inside. Shift the bolt to the outside and tighten it. Tubing O.D. No. of connection tubes Plug Model Color of release button o3.2 o4 o6 o4 o6 o8 o8 o3.2 10 20 Blue KDM10P-23 KDM10P-04 KDM10P-06 KDM10P-08 KDM20P-23 KDM20P-04 KDM20P-06 KDM20P-08 Socket KDM10S-23 KDM10S-04 KDM10S-06 KDM10S-08 KDM20S-23 KDM20S-04 KDM20S-06 KDM20S-08 Tubing O.D. Connector Model Color of release button o3.2 o4 o6 o4 o6 o8 o8 o3.2 Blue KDMP-23 KDMP-04 KDMP-06 KDMP-08 KDMS-23 KDMS-04 KDMS-06 KDMS-08 How to Use Caution Socket side Plug side Plug connector Socket connector (with seal) Separation Loosen the clamp bolt to separate the plug side from the socket side. Connection Put together the irregular faces for engagement and connect the plug case to the socket. After tightening the clamp bolt by hand, tighten it further with allen wrench (nominal width across flats: 4). Panel mounting 1. Loosen (4) screws for bracket on the socket side using a Phillips screwdriver (JIS nominal No. 2) until the bracket touches the stop ring. 2. Shift the panel mounting bracket to the inside (Move the screw for bracket in the longitudinal direction of the slot) and put the connector in the panel mounting hole. (Panel-mounting hole: See Dimensions.) Cross-recessed round head screw Plate Connector Case Principal Parts Material Model Model Plug case, Socket case Plate, Bracket Plug connector, Socket connector Clamp bolt, Screw for bracket, Cross-recessed head machine screw Type E retaining ring POM SPCC plated PBT, C3604 Electroless Body nickel plated (o8) Chuck Guide Seal Collet, Release button Stainless steel 304 Stainless steel 304, C3604 Electroless nickel plated, PBT (o8) POM NBR SWRM (Nickel plated) Stainless steel 304 Mixed Sizes of Plug Connectors and Socket Connectors The rectangular multi-connector permits connector exchange in any desired position, thus allowing use of different sizes of tubes. 3. After shifting the bolt for bracket to the outside, tighten the bolt by a Phillips screwdriver to fix the socket case. 4. Loosen the screw for bracket until the bracket touches the stop ring and shift the bracket to the inside to remove the connector from the panel. 1. Loosen the cross-recessed head machine screw by using a Phillips screwdriver to remove the plate from the case. 2. After exchanging connectors in desired places, fix the plate to the case by using a Phillips screwdriver. Series KDM 206