6-p0202-0204-dmk_en 3 / 4
10秒後にBOOKのページに移動します
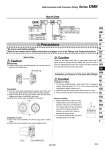
How to Use Installation and Removal of One-touch Mini Fittings 6 12 6 12 23 04 o3.2 o4 DMK 6 04 Precautions Be sure to read before handling. Refer to front matter 56 for Safety Instructions and pages 13 to 16 for Fittings and Tubing Precautions. Please do not attach metal rods or metal pipes. Metal rods or pipes cannot be secured and the fittings will shoot out. Also, if tubes are attached after metal rods or pipes have been attached, the tubes will not hold and may come loose. Installation of tubing 1. Cut the tube perpendicularly, using caution not to damage its surface. (Use tube cutter TK-1, 2 or 3. Do not cut the tube with cutting pliers, nippers, scissors, etc.) 2. Grasp the tube, then slowly push it until it comes to a stop. 3. Then, pull it back gently to make sure that it does not come out. Removal of tubing 1. While pushing down on the rim of the release button, pull out the tube in the direction of the arrow (see illustration.) The release button can also be pushed down with a flat-head screwdriver. However, be careful not to break or damage the release button. 2. To reuse the released tube, cut off the damaged portion of the tube. Multi-connector with One-touch Fitting Series DMK How to Order Tubing O.D. Style Accessory (Option) Number of connecting tubes Nil P S Multi-connector Plug side only Socket side only Nil C1 C2 None Cover single side 1 pc. Cover both sides 2 pcs. Caution Caution Caution Disassembly (1) Loosen clamp ring A and disassemble the connector into the plug case and socket case. Connection (1) Turn the cases while pressing them against each other until the plug case slides into the socket case at a proper position. (2) Align at mark B of the plug and socket cases and turn them against each other to connect the two cases. (3) Screw in the clamp ring to complete the connection. Installation of cover (1) The cover can be installed on both the plug case or socket case. (2) Stretch the cover to install on the cover installation latch. Cover Cover installation latch Clamp ring 203 KQ2 KQB2 KS KX KM KF M H/DL L/LL KC KK KK130 DM KDM KB KR KA KQG2 KG KFG2 MS KKA KP LQ MQR T