p-10-2a-isocy 53 / 71
10秒後にBOOKのページに移動します
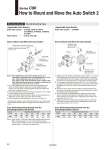
How to Mount and Move the Auto Switch Note 1) When tightening an auto switch mounting screw, use a watchmaker’s screwdriver with a handle diameter of 5 to 6 mm. Also, set the tightening torque to be 0.05 to 0.1 N・m. As a guide, turn 90° from the position where it comes to feel tight. Set the tightening torque of a hexagon socket head set screw (M4 x 0.7 x 6 L) to be 1.0 to 1.2 N・m. 1. Fix it to the detecting position with a set screw by installing an auto switch mounting bracket in cylinder tie-rod and letting the bottom surface of an auto switch mounting bracket contact the cylinder tube firmly. (Use a hexagon wrench.) 2. Fit an auto switch into the auto switch mounting groove to set it roughly to the mounting position for an auto switch. 3. After confirming the detecting position, tighten up the mounting screw attached to an auto switch, and secure the auto switch. 4. When changing the detecting position, carry out in the state of 2. . To protect auto switches, ensure that main body of an auto switch should be embedded into auto switch mounting groove with a depth of 15 mm or more. How to Mount and Move the Auto Switch 1. Slightly screw the hexagon socket head cap screw (M4 x 0.7 x 8 L) into the M4 tapped portion of auto switch mounting bracket. (2 locations) Use caution that the tip of the hexagon socket head cap screw should not stick out to the concave portion of auto switch mounting bracket. 2. Put a hexagon socket head cap screw (M3 x 0.5 x 14 L) through the auto switch's through-hole (2 locations), and then push it down into the M3 tapped part on the auto switch mounting bracket while turning it lightly. 3. Place the concave part of the auto switch mounting bracket into the cylinder tie-rod, and slide the auto switch mounting bracket in order to set roughly to the detecting position. 4. After reconfirming the detecting position, tighten the M3 mounting screw to secure the auto switch by making the bottom face of auto switch attached to the cylinder tube. (Tightening torque of M3 screw should be 0.5 to 0.7 N・m.) 5. Tighten up M4 screw of auto switch mounting bracket to secure the auto switch mounting bracket. (Ensure that tightening torque of M4 screw should be set 1.0 to 1.2 N・m.) Cylinder series C96 32 BMB3T -040 40 BMB3T -040 50 BMB3T -050 63 BMB3T -050 80 BMB3T -080 100 BMB3T -080 125 BAP2T -080 Applicable bore size (mm) Auto Switch Mounting Bracket Part No. (Including Bracket, Screw) Cylinder series C96 32 BMB4 -032 40 BMB4 -032 50 BMB4 -050 63 BMB4 -050 80 BA4 -063 100 BA4 -063 125 BA4 -080 Applicable bore size (mm) Auto Switch Mounting Bracket Part No. (Including Bracket, Set Screw) Note 2) When using D-Y7BA type, please order stainless steel screw set BBA1 separately (page 51), and use the stainless steel set screws, after selecting set screws of the appropriate length for the cylinder series . as shown in the table above. Auto switch mounting bracket Auto switch Watchmaker’s (precision) screwdriver Auto switch mounting screw Tie-rod Tie-rod Auto switch Auto switch mounting bracket