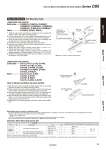
Auto switch mounting bracket Cylinder q w t y r e a b Mounting Bracket Rail Mounting Type . BQ2-012 is a set of a and b shown above. 1. Slide the auto switch mounting nut inserted into the mounting rail and set it at the auto switch mounting position. 2. Fit the convex part of the auto switch mounting bracket arm over the concave part of the rail, and slide the arm to the nut position. 3. Push the auto switch mounting screw lightly into the hexagon nut through the hole of the auto switch mounting arm. 4. Remove the set screw (M2.5) attached to the auto switch. 5. Insert the auto switch in the auto switch attachment part of the auto switch mounting bracket. 6. Secure the auto switch mounting screw (M2.5 x 0.45 x 6 L). (Tightening torque of M2.5 screw: 0.1 to 0.2 N・m) 7. Secure the auto switch mounting screw (3) after confirming the detecting position. (Tightening torque of M3 screw: 0.5 to 0.7 N・m) 8. Modify the detecting position while the auto switch is secured at the position of (3) in the figure. Solid state ・・・・・・ D-M9N(V), D-M9P(V), D-M9B(V), D-M9NW(V), D-M9PW(V), D-M9BW(V), D-M9NA(V), D-M9PA(V), D-M9BA(V) Reed ・・・・・・・・・・・・・・・ D-A90(V), A93(V), A96(V) How to Mount and Move the Auto Switch BBA2 No. 1 2 3 M3 x 0.5 x 6 L M3 x 0.5 x 8 L M3 x 0.5 x 10 L M3 x 0.5 M3 x 0.5 1 1 1 1 1 BMU1-025 BQ-1 BQ-2 BQ-1 BQ-2 D-A7, A8 D-F7, J7 Auto switch mounting nut (Hexagon nut) Auto switch mounting nut (Convex shape) Auto switch mounting screw [Mounting screws set made of stainless steel] The set of stainless steel mounting screws (with nuts) described below is available and can be used depending on the operating environment. (Please order the auto switch spacer, since it is not included.) BBA2: For D-A7/A8/F7/J7 “D-F7BA” auto switch is set on the cylinder with the stainless steel screws above when shipped. When only an auto switch is shipped independently, “BBA2” screws are attached. Note 1) A spacer for BQ-2 (black resin) is not included. Note 2) When using D-A9(V)/M9(V)/M9W(V)/M9A(V) auto switches with BQ2-012, use stainless steel screws suitable for the auto switch mounting bracket. Stainless Steel Mounting Screw Set Part no. Contents Description Size Qty. Applicable auto switch mounting bracket part no. Applicable auto switch 1. Slide the auto switch mounting nut (M3) inserted into the mounting rail and set it at the auto switch mounting position. 2. Fit the convex part of auto switch mounting arm into the concave part of auto switch mounting rail. Then slide the switch over the nut. 3. Push the auto switch mounting screw (M3 x 0.5 x 8 L) lightly into the mounting nut (M3) through the hole of auto switch mounting arm. 4. After reconfirming the detecting position, tighten the mounting screw (M3 x 0.5 x 8 L) to secure the auto switch. (Tightening torque of M3 screw should be 0.5 to 0.7 N・m.) 5. Modification of the detecting position should be made in the condition of 3. Auto switch Auto switch mounting nut (M3) Auto switch mounting rail Auto switch mounting screw (M3 x 0.5 x 8 L) Set screw Auto switch (Unused) Auto switch mounting screw M2.5 x 0.45 x 6 L Auto switch mounting screw M3 x 0.5 x 8 L (Attached to the cylinder) Solid state ・・・・・・ D-F79, D-F7P, D-J79, D-F7NV, D-F7PV, D-F7BV, D-J79C, D-F79W, D-F7PW, D-J79W, D-F7NWV, D-F7BWV, D-F79F, D-F7BA, D-F7BAV, Reed ・・・・・・・・・・・・・・・ D-A72, D-A73, D-A80, D-A72H, D-A73H, D-A76H, D-A80H, D-A73C, D-A80C, D-A79W Series C55 Series C96 Series CP96 Series C85 33 How to Mount and Move the Auto Switch Series C85