p-10-2a-isocyБ@Б@Б@35 / 71
10ХbМуВ╔BOOKВ╠ГyБ[ГWВ╔И┌УоВ╡В▄В╖
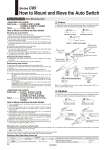
BM2 Switch bracket (Stainless steel) Switch spacer (Stainless steel) Auto switch Set screw (unused) Switch holder (Resin) d e c Auto switch mounting screw (Low carbon steel wire rod) r i u q e w y t b Figure 1. Switch insert angle Aporox. 10 to 15БЛ a Mounting correctly Mounting incorrectly Mounting correctly Mounting incorrectly Mounting Bracket Band Mounting Type 1. Tighten the screw under the specified torque when mounting auto switch. 2. Set the auto switch mounting band perpendicularly to cylinder tube. Caution Series C85 How to Mount and Move the Auto Switch Stainless Steel Mounting Screw Set Part no. BBA4 Contents Description Auto switch mounting screw Size M3 x 0.5 x 14 L Qty. 1 BJ2-006, BJ2-010, BJ2-016 BM2-020, BM2-025, BM2-032, BM2-040 D-C7, C8 D-H7 Applicable auto switch mounting bracket part no. Applicable auto switch How to Mount and Move the Auto Switch Mounting the Auto Switch 1. Attach the switch bracket to the switch holder. (Fit the convex part of the switch bracket over the concave part of the holder.) 2. Mount the auto switch mounting band to the cylinder tube. 3. Set the switch holder between the reinforcing plates of the band which is already attached to the cylinder. 4. Insert the auto switch mounting screw in the hole of the reinforcing plate through the switch holder, and thread it into the other plate. Tighten the screw temporarily. 5. Remove the set screw attached to the auto switch. 6. Attach the switch spacer to the auto switch. 7. Insert the auto switch with a switch spacer from the back of the switch holder and set it at the specified position. (Insert the auto switch with an angle of approximately 10 to 15БЛ. See figure 1.) 8. To secure the auto switch, tighten the switch mounting screw with the specified torque (0.8 NБEm to 1.0 NБEm). Adjusting the Switch Position 1. Unloosen the auto switch mounting screw 3 turns to adjust the auto switch set position. 2. Tighten the screw as described above (8) after adjustment. Dismounting Auto Switch 1. Remove the auto switch mounting screw from the switch holder. 2. Move the auto switch back towards the position where it stops at the lead wire side. 3. Hold up the lead wire side of the auto switch at the angle of around 45БЛ. 4. Maintain the angle, and pull back the auto switch obliquely at the same angle. Note 1) Be careful not to pull or strain the lead wires. Be careful not to apply excess tensile force (over 10 N) to the auto switches. Adjust the auto switch position after sufficiently loosening its screw. For the band mounting type BJ3-1, loosen the screw three rotations or more. Note 2) Be sure to use the switch spacer and switch bracket for the band mounting type. Use together with the conventional auto switch mounting bands (brackets) BJ2-ЁнЁнЁн or BM2-ЁнЁнЁн. Confirm that a switch spacer is mounted to the end of the auto switch before fastening the auto switch. If the switch bracket is not mounted, the auto switch may move after installation.