2-p0777-0973-cq2-z_en 234 / 248
10秒後にBOOKのページに移動します
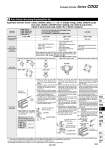
Port side A B C Auto switch mounting screw (M3 x 0.5 x 8L) Auto switch fixing screw (M2.5 x 0.45 x 10L) Auto switch mounting nut Auto switch spacer Auto switch Auto switch mounting screw (M2.5 x 0.45 x 8L) Auto switch mounting nut Auto switch Auto switch mounting screw Auto switch (with auto switch) Hexagon socket head cap screw (M2.5 x 9.5L) Hexagon socket head cap screw (M2.5 x 6L) Auto switch mounting bracket D-M9尰/M9尰V D-M9尰W/M9尰WV D-M9尰A/M9尰AV D-A9尰/A9尰V D-F7尰/F7尰V/J79/J79C/F7尰W/J79W/F7尰WV D-F7BA/F7BAV/F79F/F7NT D-A7尰/A80/A7尰H/A80H/A73C/A80C/A79W Applicable D-P3DW auto switch Auto switch mounting bracket fitting parts lineup/Weight Auto switch mounting bracket part no. Auto switch mounting surface Mounting of auto switch Bore size (mm) o12 to o200 o12 to o25 o32 to o160 . . BQ4-012 BQ5-032 . Auto switch fixing screw (M2.5 x 10L) . Auto switch mounting screw (M3 x 8L) . Auto switch spacer . Auto switch mounting nut Weight: 3.5 g . Hexagon socket head cap screw (M2.5 x 6L) . Auto switch mounting bracket (nut) Weight: 5 g . Auto switch mounting screw (M2.5 x 8L) . Auto switch mounting nut Weight: 1.5 g o32 to o100 BQ6-032S Surfaces with auto switch mounting slot Auto switch mounting rail side only A/B/C side except port side Surfaces with auto switch mounting slot . When tightening the auto switch mounting screw, use a watchmakers’ screwdriver with a handle 5 to 6 mm in diameter. Tightening torque for auto switch mounting screw Auto switch model Tightening torque D-M9尰(V) D-M9尰W(V) D-M9尰A(V) D-A9尰(V) 0.05 to 0.15 0.10 to 0.20 (N・m) o12 o12 o16 to o25 o16 to o25 o32 to o200 q Insert the nut into the auto switch mounting slot on the cylinder tube, and place it in the roughly estimated setting position. w With the lower tapered part of the auto switch spacer facing the outside of the cylinder tube, line up the M2.5 through hole with the M2.5 female thread of the auto switch mounting nut. e Gently screw the auto switch mounting nut fixing screw (M2.5) into the thread of the auto switch mounting nut through the mounting hole. r Engage the ridge on the auto switch mounting arm with the recess in the auto switch spacer. t Tighten the auto switch mounting screw (M3) to fix the auto switch. The tightening torque of the M3 screw must be 0.35 to 0.45 N・m. y Confirm where the mounting position is, and tighten the auto switch fixing screw (M2.5) to fix the auto switch mounting nut. The tightening torque of the M2.5 screw must be 0.25 to 0.35 N・m. u The detection position can be changed under the conditions in step t. q Insert the nut into the auto switch mounting slot on the cylinder tube, and place it in the roughly estimated setting position. w Engage the ridge on the auto switch mounting arm with the recess in the cylinder tube rail, and slide it to the position of the nut. e Gently screw the auto switch mounting screw into the thread of the auto switch mounting nut through the mounting hole on the auto switch mounting arm. r Confirm where the mounting position is, and tighten the auto switch mounting screw to fix the auto switch. The tightening torque of the M2.5 screw must be 0.25 to 0.35 N・m. t The detection position can be changed under the conditions in step e. q Fix the auto switch and the auto switch mounting bracket temporarily by tightening the hexagon socket head cap screw (M2.5 x 9.5L) 1 to 2 turns. w Insert the temporarily tightened mounting bracket into the mating groove of the cylinder tube, and slide the auto switch onto the cylinder tube through the groove. Insert the auto switch onto the cylinder/actuator through the groove with the back part of the auto switch (lead wire side) and the back part of the auto switch mounting bracket. e Check the detecting position of the auto switch and fix the auto switch firmly with the hexagon socket head cap screw (M2.5 x 6L, M2.5 x 9.5L).. r If the detecting position is changed, go back to step w. .The hexagon socket head cap screw (M2.5 x 6L) is used to fix the mounting bracket and cylinder tube. This enables the replacement of the auto switch without adjusting the auto switch position. Note 1) Ensure that the auto switch is covered with the mating groove to protect the auto switch. Note 2) The tightening torque of the hexagon socket head cap screw (M2.5 x 6L, M2.5 x 9.5L) must be 0.2 to 0.3 N・m. Note 3) Tighten the hexagon socket head cap screws evenly. Note) Auto switch mounting bracket and auto switch are enclosed with the cylinder for shipment. For an environment that needs the water resistant auto switch, select the D-M9尰A(V) type. Auto switch mounting bracket for the D-F7BA(V) type uses BQ4-012 and BQ5-032 normal specifications (metal screw). . The auto switches applicable to the CDQ2尰R/尰V (water resistant) is the D-M9尰A(V) type. . The applicable auto switches for the CDQ2尰尰尰-S/-尰T (single acting) are those except for the D-P3DW type. When requesting the enclosure of the auto switch mounting brackets (2 pcs.) with the cylinder for shipment, add “-BQ” to the end of the cylinder model number. Standard model no. +BQ Example) CDQ2B32-30DZ-BQ/ CDQ2B32-30DZ-BQ-XC4 (Made to Order) 4 Auto Switch Mounting Brackets/Part No. Applicable Cylinder Series: CDQ2, CDQ2W, CDQ2尰尰尰-尰S/-尰T (Single acting), CDQ2, CDQ2W (Large bore size), CDQ2K, CDQ2KW (Non-rotating rod), CDQ2 (Long stroke), CDQ2尰S (Anti-lateral load), CDQ2尰R/尰V (Water resistant) Compact Cylinder Series CDQ2 959 CUJ CU CQS RQ CQM CQU MU -Z D-𡱖 -X𡱖 Technical data CQ2 -Z