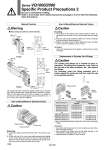
B A A B A B A B Clamp bracket B Clamp bracket A Clamp screw Slide locking type (Manual) VQ1000 Bore o1.7 ON OFF Orange Green VQ2000 Bore o2 Bore o2 ON OFF ON OFF ON position Green ON position OFF position Orange OFF position . Refer to “Manifold Optional Parts” on pages 1051, 1052, 1058 for other types of fittings. Applicable tubing O.D. Applicable tubing o3.2 Applicable tubing o4 Applicable tubing o6 Applicable tubing o8 M5 Applicable tubing o1/8" Applicable tubing o5/32" Applicable tubing o1/4" Applicable tubing o5/16" VVQ1000-50A-C3 VVQ1000-50A-C4 VVQ1000-50A-C6 VVQ1000-50A-M5 VVQ1000-50A-N1 VVQ1000-50A-N3 VVQ1000-50A-N7 VVQ1000-51A-C4 VVQ1000-51A-C6 VVQ1000-51A-C8 VVQ1000-51A-N3 VVQ1000-51A-N7 VVQ1000-51A-N9 VQ1000 Fitting assembly part no. VQ2000 1. Use caution that O-rings must be free from scratches and dust. Otherwise, air leakage may result. 2. After screwing in the fittings, mount the M5 fitting assembly on the manifold base. (Tightening torque: 0.8 to 1.2 N・m) 3. Purchasing order is available in units of 10 pieces. Caution How to Mount/Remove Solenoid Valves Replacement of Cylinder Port Fittings Caution Caution Removing 1. Loosen the clamp screw until it turns freely. (The screw is captive.) 2. Lift the coil side of the valve body while pressing down slightly on the screw head and remove it from the clamp bracket B. When the screw head cannot be pressed easily, gently press the area near the manual override of the valve. Caution Dust on the sealing surface of the gasket or solenoid valve can cause air leakage. How to Mount/Remove Solenoid Valves Caution Mounting 1. Press down on the clamp screw. Clamp bracket A opens. Diagonally insert the hook on the valve end plate side into clamp B. 2. Press the valve body downward. (When the screw is released, it will be locked by clamp bracket A.) 3. Tighten the clamp screw. (Proper tightening torque: VQ1000, 0.25 to 0.35 N・m; VQ2000, 0.5 to 0.7 N・m.) The cylinder port fittings are a cassette for easy replacement. The fittings are blocked by a clip. Take out the clip with a flat head screwdrier, etc., then replace the fittings. For mounting, insert the fitting assembly until it strikes against the inside wall and then insert the clip to the specified position. Clip Fitting assembly Clip VQ1000 VQ2000 Manual Override Warning The manual override is locked by sliding it all the way to the pilot valve side (ON side) with a small flat head screwdriver or finger. Slide it to the fitting side (OFF side) to release it. In addition, it can also be used as a push type by using a screwdriver, etc., of o1.7 or less. (o2 or less for VQ2000). Fittings assembly Series VQ1000/2000 Specific Product Precautions 2 Be sure to read before handling. Refer to front matter 53 for Safety Instructions and pages 3 to 8 for 3/4/5 Port Solenoid Valve Precautions. 1062