1-p0527-0653-sv1000_en 99 / 128
10秒後にBOOKのページに移動します
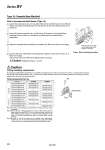
SV1000 VVQ1000-50A-C3 VVQ1000-50A-C4 VVQ1000-50A-C6 . VVQ1000-50A-N1 VVQ1000-50A-N3 VVQ1000-50A-N7 . VVQ1000-51A-C8 . VVQ1000-51A-N9 . SV2000 . VVQ1000-51A-C4 VVQ1000-51A-C6 VVQ1000-51A-C8 . VVQ1000-51A-N3 VVQ1000-51A-N7 VVQ1000-51A-N9 . VVQ2000-51A-C10 . VVQ2000-51A-N11 P B B B B D Type 16: Cassette Base Manifold Loosen the screws a (2 pcs. on one side) that hold the manifold base onto the DIN rail. (When removing the manifold base from the DIN rail, loosen the holding screws at four locations.) How to increase manifold bases (Type 16) (1) (3) Attach the manifold block assembly to be added to the DIN rail as shown in the figure. (4) (2) Caution (Tightening torque: 1.4 N・m) Using a flat head screwdriver, etc., pull the lever b forward on the manifold block assembly where a station is to be added, and disconnect the manifold block assemblies. Connect the block assemblies by pressing them together, and push the lever b in firmly until it stops. Then secure them to the DIN rail by tightening the screws a . Figure. Block mounting procedure Hook this part onto the DIN rail, and press down in the direction of the arrow. Fitting assembly replacement Caution By replacing manifold fitting assemblies, it is possible to change the size of the A, B ports and P, E ports. To replace them, Remove the clip with a flat head screwdriver, etc., and pull out the fitting assembly. Mount the new fitting assembly by inserting it and then replacing the clip to its fully inserted position. Fitting Assembly Part No. One-touch fitting for o3.2 One-touch fitting for o4 One-touch fitting for o6 One-touch fitting for o8 One-touch fitting for o1/8" One-touch fitting for o5/32" One-touch fitting for o1/4" One-touch fitting fo o5/16" One-touch fitting for o8 One-touch fitting for o10 One-touch fitting for o5/16" One-touch fitting for o3/8" Port size Note 1) Be careful to avoid damage or contamination of O-rings, as this can cause air leakage. Note 2) When removing a fitting assembly from a valve, after removing the clip, attach tubing or a plug (KQ2P-) to the One-touch fitting, and pull it out while holding the tubing (or plug). If it is pulled out while holding the release button of the fitting assembly (resin part), the release button may be damaged. Note 3) Be sure to shut off the power and air supplies before disassembly. Furthermore, since air may remain inside the actuator, piping and manifold, confirm that the air is completely exhausted before performing any work. P, E Port A, B Port Clip Fitting assembly O-ring Series SV 624